- Insert your Wireless Card into the R-Series defibrillator
- Enter System Configuration mode
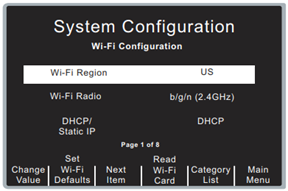
- Select ‘Wi-Fi’
- Wi-Fi Region should be set to US
- This can ONLY be configured once. If this is configured incorrectly, and cannot be changed, contact ZOLL technical support for assistance.
- This can ONLY be configured once. If this is configured incorrectly, and cannot be changed, contact ZOLL technical support for assistance.
- Select “DHCP” or “Static”
- If using Static IP, fill in information on config page 2 of 8 on the device
- If using DHCP IP, proceed to config page 3 of 8 on the device
- Set Use Host Name to “Yes”
- This will allow you to use the server host name.
- CaseReview customers - Fill in "Server Hostname (Full Disclosure)"
- US Cloud Customers: dxsvc.zollonline.com
- Canadian Cloud Customers: dxsvc.ca.zollonline.com
- In-Premise customers: enter the URL (recommended) or IP address as provided by your IT department.
- CaseReview customers - Fill in Server Port (Full Disclosure)
- 00443
- CaseReview customers - Fill in Username (Full Disclosure)
- Cloud CaseReview customers will use the Data Access Key (DAK) from their ZOLL Online tenant. This field is the “Alternate ID” of the DAK
- In-Premise CaseReview customers will enter the Full Disclosure username that was configured during installation of your CaseReview software.
- Fill in Password (Full Disclosure)
- Cloud CaseReview customers will use the Data Access Key (DAK) from their ZOLL Online tenant. This field is the “Password” of the DAK
- In-Premise CaseReview customers will enter the Full Disclosure password that was configured during installation of your CaseReview software.
- ALL Customers - Fill in "Server Hostname (Defib History)"
- US Cloud Customers: dxsvc.zollonline.com
- Canadian Cloud Customers: dxsvc.ca.zollonline.com
- In-Premise customers: enter the URL (recommended) or IP address as provided by your IT department.
- ALL Customers - Fill in Server Port (Defib History)
- 00443
- ALL Customers - Fill in Username (Defib History)
- Cloud ClockSync or DeviceDashboard customers will use the Data Access Key (DAK) from their ZOLL Online tenant. This field is the “Alternate ID” of the DAK
- In-Premise ClockSync or DefibDashboard customers will enter the Defib History username that was configured during installation of your software.
- ALL Customers - Fill in Password (Defib History)
- Cloud ClockSync or DeviceDashboard customers will use the Data Access Key (DAK) from their ZOLL Online tenant. This field is the “Password” of the DAK
- In-Premise ClockSync or DefibDashboard customers will enter the Defib History password that was configured during installation of your software.
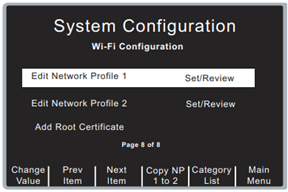
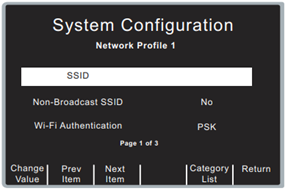
- Highlight “Edit Network Profile 1”
- Press ‘Change Value’
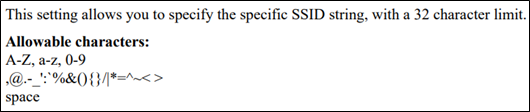
- Fill in “SSID”
- Choose the correct “Non-Broadcast SSID” setting
- If the network is publicly viewable set to “No”
- If the network is not publicly viewable set to “Yes”
- Wi-Fi Authentication
- We support PSK and Enterprise (PEAP/TLS)
- If you select “PSK” fill in the password
- If you select “Enterprise”, follow the prompts
- Select Enterprise
- Fill out further User and Pass required areas for PEAP or TLS
- Select ‘Return’ with softkeys
*****WIRELESS PASSCODES HAVE A 63 CHARACTER LIMIT!*****
- Select ‘Return’ with softkeys
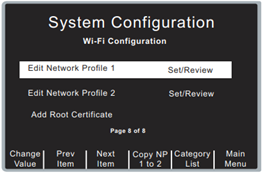
- Select “Copy NP 1 to 2” with softkeys
- CAUTION – ENSURE YOUR BUTTON SAYS: “Copy NP 1 to 2”! If you accidentally highlight “Edit Network Profile 2” it will instead say “Copy NP 2 to 1” and selecting that will overwrite everything you just did under NP 1!
- These two profiles exist to provide the device with a secondary network in case of a failure in connecting to the first. The reason we copy the same settings from profile 1 to 2 for a single wireless network is so if the device fails on the first attempt it will try again.
- Do you need to enter a Root Certificate?
- YES – All In-Premise Customers – Continue with Step 22
- NO – Hosted Customers with Wi-Fi cards at Rev. E or later (wireless cards should always be updated to the latest revision before deploying any software solution) – Skip to Step 27
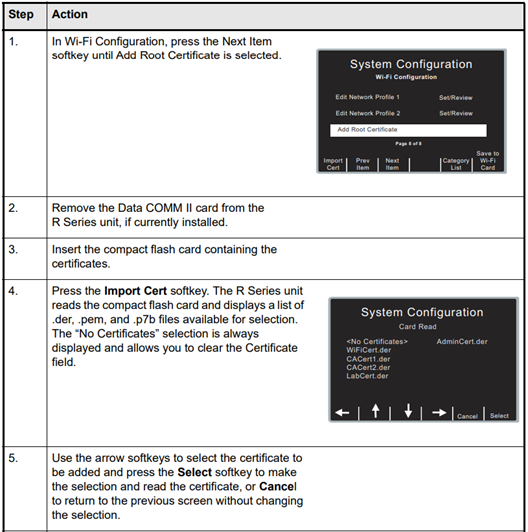
- Select “Add Root Certificate”
- For a more comprehensive guide to Root Certificates with additional information and screenshots, reference “Section 2: Root Certificates” below
- Remove your Wi-Fi card from the Compact Flash port and insert the Compact Flash card with the Root Certificate file
- Select “Import Cert”
- Highlight your Root Certificate and press the ‘Select’ softkey
- Your R-Series should return to the Wi-Fi configuration screen and show the name of the Root Certificate file on page 8 of 8 of the Wi-Fi configuration menus. If so, you may remove your Compact Flash card and insert the Wi-Fi card needing configured.
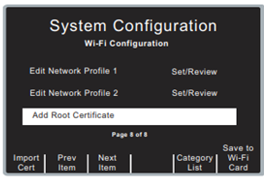
- Use the “Prev Item” or “Next Item” softkeys to highlight the “Add Root Certificate” field on page 8 of 8 on the device.
- You should see “Save to Wi-Fi Card”. If you just inserted a Wi-Fi card within the last 15 seconds you must wait for the R-Series to finish identifying it. Once it does, the “Save to Wi-Fi Card” option will appear.
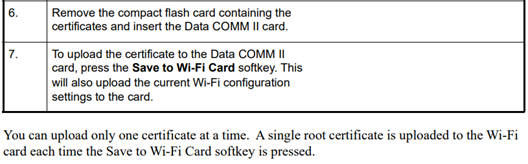
- Select ‘Save to Wi-Fi Card’ and wait for the pop-up messages
- The pop up should read “Card Write OK” - wait for this message to disappear before removing the wireless card from the device to avoid possible write errors.
- To program another wireless card, remove the one just programmed and insert the next. Repeat Steps 27 through 29.
- If you need to add multiple root certificates to the same card(s) you will repeat Steps 22 through 29 for as many root certificates as you need to add.
SECTION 2: Root Certificates
- This will allow the device to utilize an encrypted connection with the server during data transfer
- Add certificate if required by TLS network authentication
- Add certificate if PEAP certificate for network authentication is a non-public CA
Additional Certificate Information